There is a steady rise of popularity of open-world games and their domination of the bestseller list. Every new game raises the bar for the world size and complexity. Just looking at recent open world game trailers reveals their aim for a sense of a huge scale.
Building those worlds raises a big question - how to efficiently populate those massive worlds? Certainly, we don’t want to place every tree manually, especially if we are a smaller team. After all, game development is about making smart trade-offs.
When we look at a typical open world game, we can clearly see Pareto’s principle at work - 20% of content is the player’s main path and 80% is background. The player’s main path needs to have excellent quality and be strongly art directed, as players will spend most of their time there. Background, like massive forests or desert areas around main cities, doesn’t require such attention to detail. This 80% makes a great target for better placement tools, which trade quality and art direction, for the speed and simplicity of content creation.
After we had shipped our latest game “Shadow Warrior 2”, we had a chance to try some new ideas, while our design team was busy doing preproduction for a new game. We decided to spend that time building a prototype of a better placement tool, working closely with our level artists. Big thanks for my employer Flying Wild Hog, for allowing to write about it so early and to everyone who was involved in the making of this prototype.
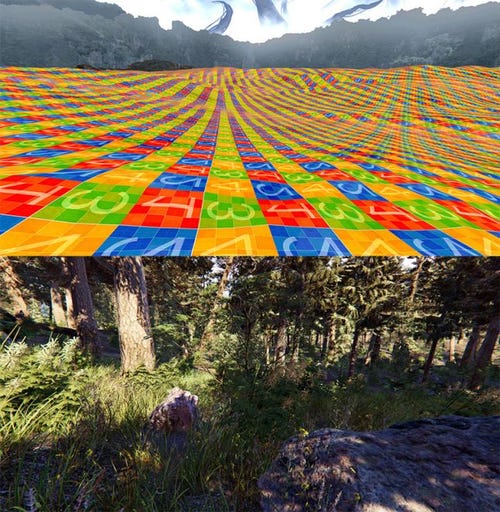
How to transform this heightmap on the top into this forest on the bottom?
Anyway, we knew how to generate a basic heightmap inside World Machine. The question was how to quickly transform that heightmap into some nice scenery, without killing the level artist team in the process.
Solution Survey
There are several ways to approach this challenge. Possible solutions include procedural placement, physics based placement, and painted color maps based placement.
Procedural placement generates content based on a set of predefined rules and a provided random seed. Those can be further divided into methods trying to simulate physics process (teleological) and methods trying just to simulate the end result (ontogenetic). Examples of teleological methods include forest generation based on a simulation of water accumulation and sun distribution in Witcher 3. Another example is UE4 procedural foliage tool which simulates growth of consecutive generations of foliage. Examples of ontogenetic methods include procedural generation based on Houdini, where technical artists write custom rules themselves, like in Ghost Recon Wildlands.
Physics based solutions are an interesting way of placing objects. They are based on physics simulation where you e.g. drop some objects from some height and let them scatter around the level. This is for example implemented inside Object Placement Tool for Unity.
Color map based placement is based on manually painted colormaps, which are later converted to assets based on some set of rules. A recent example of such an approach are tools from Horizon Zero Dawn, which were a big inspiration for us.
Starting Point
As a rather small studio with limited resources, we were always looking for ways to speed up work - including better entity placement tools.
Out first placing tool was based on physics and was done for our first game: Hard Reset (2011). The game featured dark cyberpunk cities, so we made a tool for fast placement of different kinds of “rubbish”. You could just place a bunch of objects in the air and enable physics simulation. After everything fell on the ground and stopped moving, if you liked the end results you could just press save. It was a pure joy to use that tool, but in the end, it saw quite limited use. It was hard to control the outcome and having to repeat simulation was often slower than manual placement, so in the end we decided to drop this idea.
We evaluated procedural based solutions, but it never caught on. Mostly due to the level artist team, which didn’t have much experience using Houdini or similar packages.
In the second game: Shadow Warrior (2013), we had some outdoor areas with different types of foliage, so we made a painting based placement tool. Our level workflow was then based on creating base level meshes in 3ds Max. Level artists vertex painted those level meshes and during level import this vertex painting was converted into a set of spawn points.
Painted level mesh from Shadow Warrior - vertex color stored density of grass and debris
Inside our game editor, level artists could select some area and setup a type of entity to be spawned there with a specific density and properties (e.g. align to mesh or color variation). Finally, at runtime we spawned those entities according to artist rules and runtime settings (e.g. LOD settings). This tool was well received by the level artist team and they were often asking if we could expand its functionality further.
Requirements
We started with writing down features which we expected from a new system:
Quick prototyping. We want to quickly prototype worlds based on some high-level input from level artists, so they can roughly specify the overall look of the world in a fast manner. Level artist need to at least be able to specify, which areas are a forest, which a desert etc. E.g. draw a 2D world map and then convert that to an in-game world. It is crucial to quickly have some world prototype up and running inside game, so the entire game team can start their work.
Simple and safe iterations. We need a way to do safe last-minute tweaks, which won’t rebuild the entire world and which won’t require to lock the area (convert placement tool data to manually placed entities). Locking the area allows arbitrary entity placement changes, but also destroys the entire idea behind a placement tool, as after a lock there is no way to tweak placement rules without destroying manual changes in the process. E.g. decreasing a parameter like tree density needs to remove a few tree instances and not to rebuild entire forest from scratch.
Incremental. For smaller teams it’s important to able to incrementally add new assets. We can’t just plan in the first year of development, make assets in the second year, place them in the third year and ship the game. We need to able to work on the assets during the entire production and have some painless way to add them into existing world. For example, we need a simple way to replace one tree type with two tree types without changing their placements.
Seamless integration with manually placed content. Obviously, we need some way to place a military base inside a generated forest or manually place a road that goes through that forest, without having to worry about generated trees sticking out of the placed building or roads.
We were ready to trade some quality and manual control for the ability to place content more efficiently.
Biome Painter
While looking at how our level artists were using our previous painting tool, we noticed them doing duplicate work. For example, they first place some grass entities and later paint terrain under that grass with a matching grass texture. We decided to generate both terrain texturing and entity placement from the same system. It not only speeds up work, but also creates a coherent world, where all assets are placed on matching terrain textures.
We wanted to be able to reuse biome color maps in order to speed up prototyping. To solve that we based our system on two color maps: biome type (e.g. forest, desert, water etc.) and weight (lushness) and introduced some rules regarding how to paint the weight map: low values should mean almost clear terrain and high values mean lush vegetation or a lot of obstacles.
In our previous painting tool, we often had to revisit and repaint old areas, when a new batch of prefabs was completed. In order to simplify iterations we decided to build a system with more complex rules - namely a list of spawn rules which are evaluated in order of importance - from the most important one to the least important. This enables painless addition of a new prefab into an existing area.
Additionally, in order to be able to iterate, we need to keep the impact of rule changes to a minimum. To solve that we base everything on pre-calculated spawn points and pre-calculated random numbers. For example, tree spawn points need to be fixed, so when you tweak their placement density, new instances appear, but most of the forest stays intact.
Finally, after some initial tests we decided that after all we need some procedural generation in order to break some repetitive patterns. We solve that by placing very low density (low chance to spawn) special objects - e.g. a fallen tree inside forest.
Biome Rules
Now when we have a biome type map and weight map, we need some rules describing how to convert those maps into entities and terrain textures.
Texture rules are quite simple:
Biome weight range with custom falloff
Terrain height range with custom falloff
Terrain slope range with custom falloff
Density
Every rule has a specific terrain texture assigned to it and we apply those rules bottom-up. First, we fill entire biome with the base texture. Then we evaluate consecutive rules and place assigned texture if conditions are met, effectively replacing the previous one at that location.
Entity placement rules are a bit more complex:
All of the above texture rules
Align to ground or to world up axis - e.g. trees are aligned to world up axis (as they usually grow up), but stones are aligned to the terrain
Random angle offset off the align axis - allows to break uniformity of e.g. bamboo trees
Random rotation around align axis


