Hey folks! I’d like to kick off this first blog post by talking about a very important piece of tech in our latest fossil-digging adventure game, the tile system!
When I say tile system, I'm talking about the little square objects that make up a game world, their visuals, and the system that manages them.
I tried several approaches to creating a tile system before developing the one we’re using now. In this article, I’m going to walk you through the ones that *almost* worked for us (but didn’t) then talk about how we finally pulled it off.
But first, who am I? I’m Ryan Miller, Technical Director at Reptoid Games - a small game studio in Toronto, Ontario making our first big game, Fossil Hunters, which is all about discovering fossils and building your own dinosaur skeletons. I’m a digital artist turned programmer who loves getting my hands on everything from art to code.
Now let's begin looking at the different types of tile systems.
Approach #1: Classic 16-4 Tiling
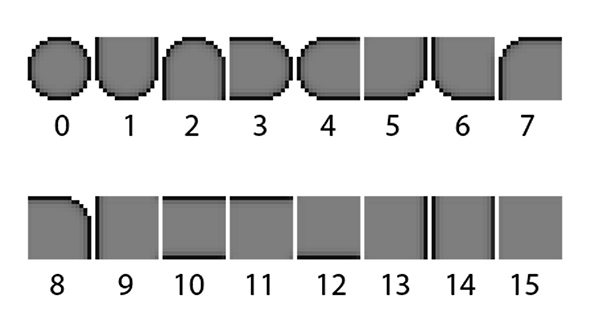
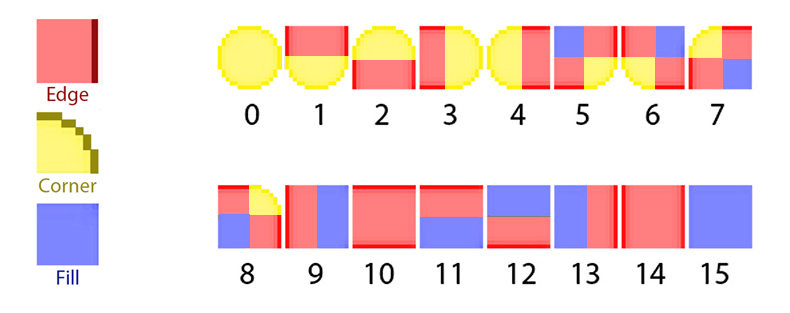
The first thing I tried is a very classic approach that I’m calling the 16-4 method. This is the technique you see the most often in games and has been around a long time. Each tile will choose to use 1 of 16 pieces of artwork based on which of its 4 neighbors (north, east, south, west) are present.
16 pieces of art, 4 neighbors = 16-4 method.
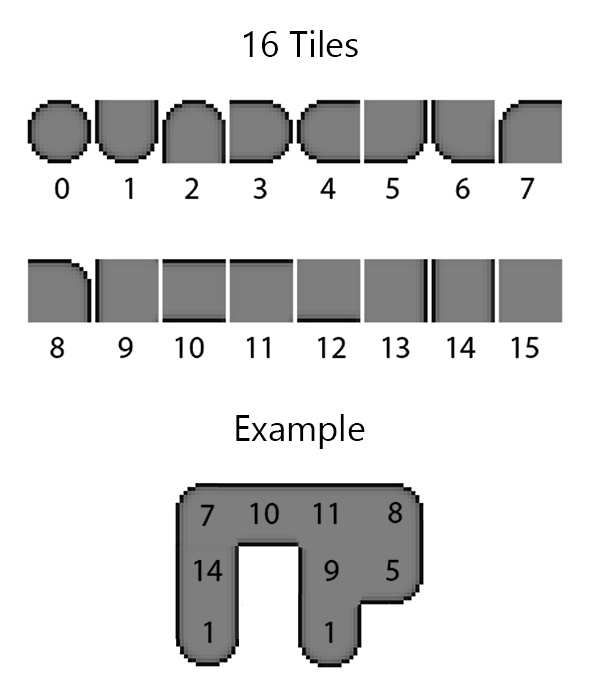
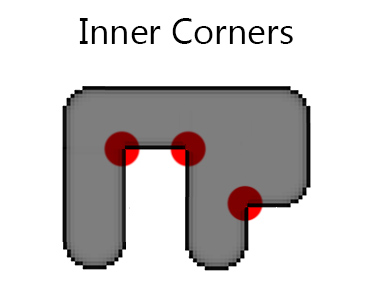
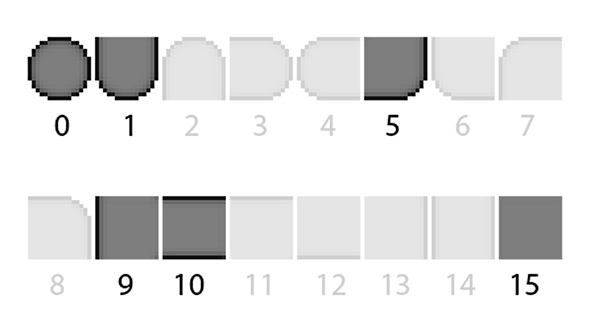
This is a great solution for 2d / pixel art, but we found that it’s lack of inner corner support was detrimental to our desired look. You can see the inner corners I’m talking about in the image below, colored in red.
We could create additional tiles with inner corners, but this would result in exponentially more pieces of art that need to be created and selected from. A tile looking at it’s 4 neigbors makes for 16 required art assets, but a tile looking at it’s 8 neighbors (required to detect inner corners) makes for 81 required assets. Yikes! That's too many to create.
Let’s look for another approach.
Approach #2: Tile Borders
For the second approach, I tried to pivot away from creating so much artwork, and landed on a technique I call ‘Tile Borders’. You’ve probably seen this technique used in Spelunky. It requires less assets than the traditional 16-4 method (technically just 1 tile and 1 border will work). It works by drawing seamless tiles, then covering up the edges of those tiles with border pieces.
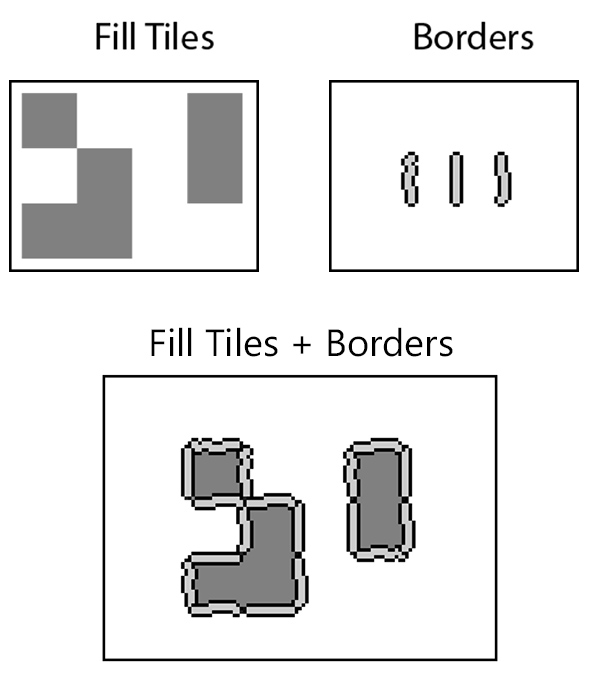
An added benefit of this technique is that it allows for tiles of different sizes (not just 1x1), which helps the tile set look more interesting and less repetitive.
I particularly like this article, which explains the technique in more detail.
I decided not to go with this technique because the border ‘caps’ didn’t match our art style – we didn’t like that every tile had so much intersecting geometry and a mandatory ‘ridge’ on the edge.
Approach #3: Voxel-based Mesh Generation
Third time is the charm right? That’s why everything is always finished in three steps, right? </sarcasm>
Approach #2 left me feeling fragmented, so I started looking into more cohesive solutions. Voxel based meshes are created procedurally based on a definition of mass. This solution sounds like a great candidate, one procedurally generated mesh requires very little asset generation, and can be created to be nice and smooth.
Upon starting to experiment with voxels, three things became very clear.
I don't have much experience generating meshes at runtime
I do have a lot of experience authoring 3d content
I can’t control the look of voxel-based meshes very accurately.
Voxels are certainly worth revisiting, and people are doing some incredible things with procedural mesh generation, but I ultimately passed on this solution because it just doesn’t suit our team’s strengths.
A Breakthrough Realization
Finding a balanced approach to the desired complexity and visuals was proving more difficult than I had expected. The visuals might have to suffer in order for use to move forward. At this point I started to take a closer look at the 16-4 method.
If the main problem I had with this technique was that it required too many different art assets, what are some ways I could reduce it?
I could remove the tiles that are just rotated versions of other tiles, and instead rotate them in-engine. That gets us a reduction from 16 tiles to 6. Not bad, but I think we can do better. This also doesn't take inner corners into account.
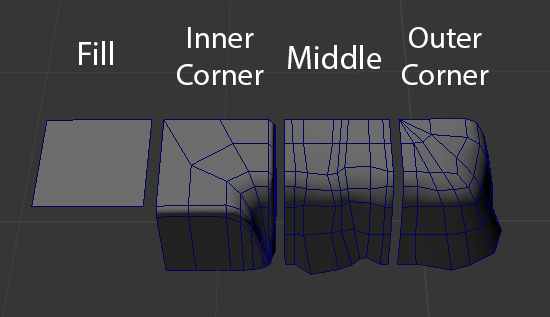
After looking more closely, I notice that there’s really only three shapes in here. Corners, Edges, and Fills. Let’s get some visualizations, shall we?
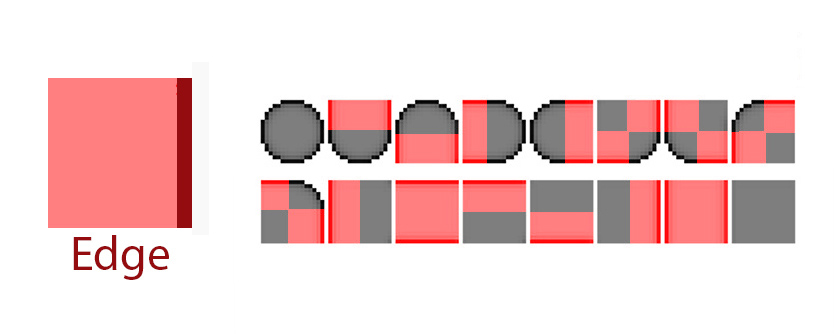
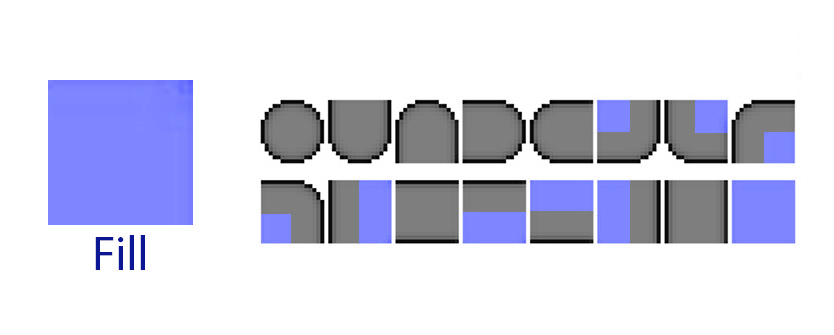

Looking at the images above, you can see each tile could be made of up 4 of these shapes in some configuration.
What if, instead of single tile pieces, each tile could be 4 pieces that get glued together with code? We can even add inner corner pieces. I think we have our solution.
We have a winner! 8-4-4 Tiling
Instead of building every possible full tile piece (81 pieces, because we want inner corners), we can build 4 smaller 'sub-tiles' and combine them together, 4 at a time, to create full sized tile pieces.
Have I mentioned that I’m making up all these names? The 8-4-4 name sums up the components required by this system;
8 neighbor lookups (N, NE, E, SE, S, SW, W, NW)
4 art assets (Fill, Outer, Inner, Edge)
4 sub-tiles (NE, SE, SW, NW)
With this setup, each tile has a simple instruction set to change to match its neighbors:
For each of the 4 sub-tiles…
Look at this sub-tile’s 3 neighbors (eg: for NE tile, look at N, NE, and E neighbors)
Change this sub-tile’s mesh to Fill, Outer, Inner, or Edge
Rotate the sub-tile to match its position in the tile
Tile Meshes
The edges of the tile meshes need to be carefully aligned in order to prevent unwanted seams. This is more easily accomplished when modelling geometry than when UV unwrapping. Which brings us to the next point…
Texture Mapping
UV Unwrapping is simple enough, but once we start authoring texture maps it becomes clear that the texture seams are going to be a big pain.
Sub-tiles need to match up against each other in many combinations, else we’ll see ugly texture seams. It’s not an insurmountable problem – enough time spent texturing will eliminate the seams (see below), but it is taxing, and ultimately limiting on the visuals (see below).
Repetitive Textures
It doesn’t look terrible, but the repetition gets pretty intense when you see a lot of tiles together. I briefly experimented with a technique that swapped out chunks of fill tiles with bigger fill tiles (recognize a 2x2 area of fill tiles and replace them with a bigger 2x2 tile), but this proved cumbersome both on asset creation and on performance.
Shaders to the Rescue
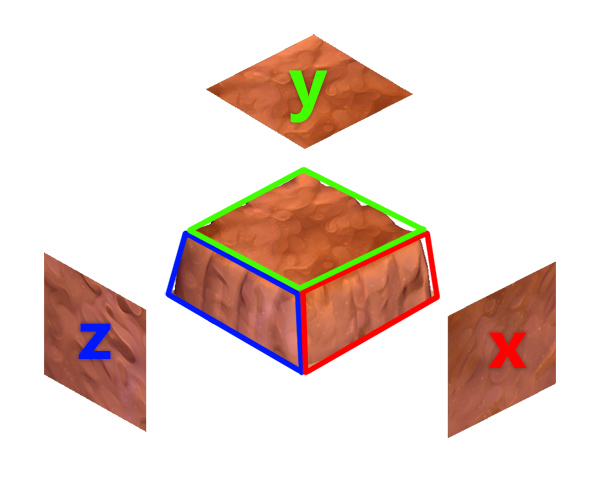
Instead of mapping textures to the mesh’s unwrapped UVs, I use something called Triplanar Mapping. This technique is traditionally used to map textures on terrain and other meshes generated at runtime that aren’t suited to authored UVs.
Triplanar rendering compares 3 world directions (X, Y, Z) to the normal direction of a polygon face and aligns UVs accordingly. It’s great for polygons that face X, Y or Z (like tiles!).
Triplanar Mapping Technique
There's a handy ShaderForge tutorial


