In my previous blogs, I always skipped the introduction to photogrammetry as there are a lot of introductory tutorials, yet I recently noticed that most of them don’t go into depth on how to properly capture your images. Therefore, I decided to create my own guide on everything I know about photogrammetry.
This article is meant to one for these audience categories:
Those who never used photogrammetry or 3D scanned before
Those who used photogrammetry before, you read the introductory tutorials, and they want to improve their scan quality
Those who probably know all of this, and you are just checking if they missed something.
To keep it simple and easier to read, I’ve separated each point into a section. Feel free to skip the one you feel confident in. If you are a beginner, I would highly recommend that you check out the blog posts I mention, I might also link to multiple article that cover the same topic, you might want to read all of them if you have time. These blog posts are meant to be independent of each other, and therefore if you read some of my previous post, please excuse the repetition.
Special thanks to Jugoslav Pendić for going over this article and adding some his knowledge to it, and another thanks to the 3D scanning group wo helped me fill some gaps in my knowledge.
What is Photogrammetry?
If you are reading this article, hopefully you already know what photogrammetry is, but in short, photogrammetry is the process of creating 3D models from multiple images of the same object taken from different angles.
Though this technique is not recent at all, it’s much older than the machine vision derived workflow that we have today and it was widely used as part of a mapping/geodetic toolset. It became more popular lately as it became more accessible with the increase of the processing power of consumers machines, which enabled it to spread to other markets like VFX and GameDev.
If you want to quick start with photogrammetry, I would highly recommend checking out the following:
PhotoScan Guides and Tests (Short Videos) by James Candy.
The Poor Man’s Guide to Photogrammetry by Bertrand Benoit.
Although these links mentions Agisoft Photoscan, the explained concepts should work with any other photogrammetry software solution out there.
The Software
There are many photogrammetry software that you can use to process your captured images, and usually most of them will give you decent result. Though there are some areas where one might shine over the other. It is worth noting however, while the rules of capturing your photos are universal to all software, due to how each software process the data differently, there are some software-specific guidelines that will enable you take advantage of the full power of certain a solution, and I would recommend investing some time in knowing your software.
For example, for Agisoft due to the limitation of your processing power, you might want to squeeze as much details as possible into one image, and Agisoft is good at reconstructing background details. While Reality Capture tend to filter out those background details as they might introduce some noise, though Reality Capture is faster, and you can just take more photos.
One thing to note, these descriptions are based of my personal experience with these software which might differ for your projects, and I would recommend you explore these options (or other options) yourself, and form your own opinion.
Autodesk Remake: You might have heard of Autodesk 123DCatch Mobile App, which is the cloud-based photogrammetry solution for mobile which is limited to 50 images/project that are downgraded to a 3 Mpx resolution. This was followed by the PC solution Memento that was later renamed Remake, which has both offline and cloud processing options. Remake is a one-click generate-all process where you have minimal control on how your data is processed. It is available in both free and pro versions. The free version is limited to 125 images/project and only cloud processing based, while the pro version is subscription based 30$/month, and is limited to 250 images/project and has also the offline option available. Once the scan is processed, you can edit it and clean it inside remake or import meshes from other software, which is a nice option that I keep making using of, though having more control over the mesh generation process would be nice to have. It also has a polycruncher (reduces mesh polycount), and texture bake options, which can be a quick way to create placeholder meshes for your level. Though you might want to check the licensing for your scans when processed using the cloud, as it may give access to Autodesk to use them as promotional material.
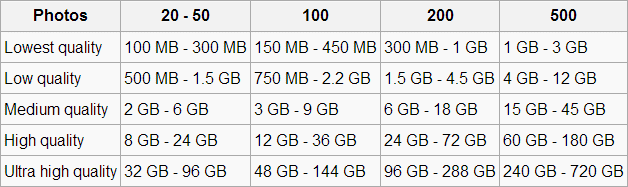
Agisoft Photoscan: This is a very popular solution that is widely used in the in the entertainment industry. Agisoft gives great scan results, gives you control over the mesh generation process, and has a friendly user interface that is well documented. The standard version cost 180$, however if you need the ground control point option, which a very useful feature when it comes to large scan, you need to get the professional version which cost 3500$. Nonetheless, while Agisoft does not have an image/project limit, the more images you use the more powerful your rig has to be in order to process it, not to mention that the processing time can be quiet slow. You can check out the Agisoft Support website for some tutorials, and Tips and Tricks. Here’s a helpful guide of PhotoScan Memory Requirements, where you can find useful tables like this RAM requirement table for the building model step of 12MPx images.
Reality Capture: It can process data much faster than its competitors, and can handle a huge amount of images on a regular desktop as long as it has an NVidia GPU. A cool feature that reality capture excels in is the quick align features, which allows you to align images in a matter of seconds on your laptop, which is an awesome tool to test your dataset on site, and make sure you have enough images. You can get similar alignment speeds in Agisoft using the lower settings, though it’s the point cloud reconstruction step where RC excels at, and is significantly faster than Agisoft. It cost 99€ for 3 months, however this version only handles 2500 images/project which is more than enough to scan anything other than large structures (castle, terrains, etc.), if you need to process more images, you need to get the CLI version which costs 7500€ for a year. Both version have all the same features including ground control points. It is worth noting that as of right now Reality Capture does not have 16-bit output support, nonetheless it is relatively recent software, and it is constantly being updated, 16-bit support will be implemented eventually.
Pix4d: If you want to process more than 2500 images, and if it is a onetime project, then you might be better of going with Pix4d monthly subscription of 350$. It can handle large datasets on powerful computer, and is slightly faster than Agisoft. This software is mostly spread in the industrial and agriculture industry, due to its specialized set of tools. Pix4d have some interesting webinars on their YouTube channel, where they go over how to make the most out of their software, and discuss some tips and trick for photogrammetry. It is worth noting that during my testing, I was not quite satisfied with the resulting texture quality, though this can be improved by tweaking the settings a little.
Free Solutions: There are many free alternatives, though unfortunately I haven’t tested any myself. I’ve reached out to the community and asked their opinion about it, and here’s what I got. VSFM is a nice solution though it is outdated, and you cannot use it for commercial use. There are more recent solutions that you can use like Micmac, MVS, or Python Photogrammetry Toolbox (PPT) though these options don’t have a GUI (graphical user interface), and with the lack of documentation and programming background, it might be challenging for new adopters. Nonetheless these solutions are still powerful, accurate and very flexible, Micmac even have a wiki page. There is a new solution named Graphos that has a GUI, and is supposed to be free or cheap, though it has not been released yet, and we haven’t heard of an update recently.
There is also SuRe which is interesting because just dealing with it makes you learn a lot - it does have GUI (only the very first versions have had command line workflow) and authors are very open about what they are offering. That being said, Sure is almost totally focused on large format cameras, and/or selling their code to be included into more user friendly environment. Sure does not even have 'alignment' step, but relies on data exported from Pix4D, Agisoft or other products. It excels on speed of generating dense point clouds, and amazingly accurate texturizing, but has insanely huge RAM memory demands, bigger than Agisoft. Also, models it creates, meshes - amazing detail, however, hard to deal with unless you have a good machine. Also / it is not free, but is available for scientific purposes, through communication with authors.

PC
Depending on what software you decide to use, you might need different specs, however after some research and experimentation, I found these setting to be the in-common recommended minimum requirement for most software:


