(Disclaimer: Teofilo is now Senior Engineer at Archiact Interactive but worked as Core tech engineer at Black River Studios during the development of Angest)
This article was written in collaboration with Janderson Lima (Technical artist, Black River Studios).
In this article, we continue the series of posts (Graphics and Optimization - Part 1 and Management of Scenes and Takes) related to our recent released game, Angest. Angest is narrative-driven game made by Black River Studios (Finding Monsters Adventure Rococo VR Rock & Rails) available for GearVR. Our previous performance related article was about some techniques that we used to reduce the number of draw calls in our scenes; here we talk about techniques and tricks used to achieve the lighting, color and other visual effects desired for the game.
<iframe title="ANGEST" src="//www.youtube.com/embed/CoJgJeJznII?enablejsapi=1&origin=https%3A%2F%2Fwww.gamedeveloper.com" height="360px" width="100%" data-testid="iframe" loading="lazy" scrolling="auto" class="optanon-category-C0004 ot-vscat-C0004 " data-gtm-yt-inspected-91172384_163="true" id="194655950" data-gtm-yt-inspected-91172384_165="true" data-gtm-yt-inspected-113="true"></iframe>
GearVR is a very restrictive platform resource-wise speaking. Despite the limitations, we do wanted to have high quality graphics while keeping the performance demanded by Oculus (60fps). In order to achieve the results desired, we needed to resort to tricks to fake visual effects that would demand too many resources. Those tricks are detailed in the next sections.
Preparing the environment
Before explaining the visual effects let’s recapitulate some of the steps we take to save resources in terms of processing. As more resources we have available, more budget we will have to improve visual effects. I’m not going deep into this because these steps are well referenced over there (here, here, here, here and here, just to cite a few), I’d like just to reinforce the importance of keeping your shaders simple; reducing overdraw; and, compressing textures. Those play a very important role in keeping our resource usage low.
Artists at Black River Studios create shaders using ShaderForge, which is an awesome tool, however most of the code generated is placed at fragment shader and it might also generate redundant code. Be aware also that some options in ShaderForge add a second pass to the shader (remember to select ‘Single directional’ in ‘Light Count’ and to tick ‘Force no custom shadow pass’ in ‘Experimental’). Depending on the complexity of the shader, we need to refactor the code manually once the artist finishes it. What we usually do is:
To move constant computations to script and send final value via uniform;
To move all possible computations from fragment to vertex shader;
To remove redundancy;
Your texture does not use Tilling and Offset? Remove TRANSFORM_TEX() usage.
If not using Unity’s fog remove lines (or untick ‘Receive Fog’ in ShaderForge’s ‘Blending’):
#pragma multi_compile_fog
UNITY_FOG_COORDS(x)
UNNITY_TRANSFER_FOG(o,o.pos);
UNITY_APPLY_FOG(i.fogCoord, finalRGBA);
Shader optimization might be a bit tricky, be always measuring the effect of your changes using profiling tools such as Mali Offline Shader Compiler, Mali Graphics Debugger or Adreno GPU Profiler.
Overdraw
We reduce overdraw by sorting materials properly (opaque in front-to-back order) using a script where the user sets an array of materials in the order they have to be drawn (Figure 1). This script was useful because we had materials shared between scenes (bad practice!) that had a different order at each scene.
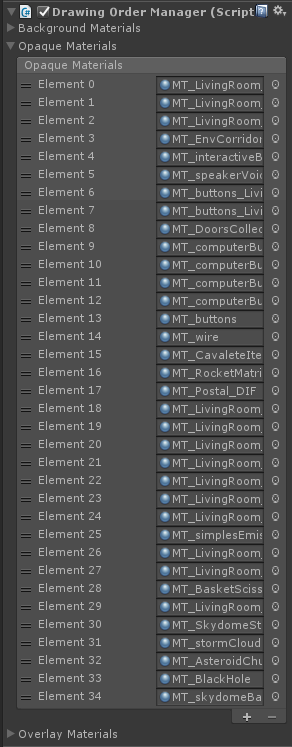
Figure 1 Example of Drawing Order Manager usage. The drawing order is set from the top element to the bottom one in the list.
Texture compression
We know that we must always compress textures. With a few number of textures and having them compressed: there will be less data to be copied to memory, faster loading times and your device will take more time to get hot or overheat. In GearVR case, we must always use ASTC. What people sometimes do not know is which ASTC option to choose or what they mean.
ASTC is a texture compression format developed by ARM and AMD. In (very) short, the texture is divided into blocks of pixels with 128 bits per block for storage. We can then choose a block dimension from 4 x 4 pixels up to 12 x 12 pixels. Well,
(128 bits)/(4 x 4) = 8 bits per pixel;
(128 bits)/(12 x 12) = 0.89 bits per pixel.
We can conclude that the smaller is the block (4 x 4), the more bits per pixel we will have, i.e., more quality and higher size; whereas a larger block (12 x 12) means less quality and lower size. For comparison sake, a true color RGB 24 bit texture with no compression has 16 MB; ASTC compressed 4 x 4 has 5.3 MB; and ASTC compressed 12 x 12 has 0.6 MB. Now it is up to you to choose the block size that suits better the result you want to achieve. And, finally, do not forget to compress your lightmaps.
Static lighting
For our static lighting we bake lightmaps and that demands preparing the UVs of our 3D models. In Unity the UV2 is used for lightmapping. The UVs of the objects can be either opened by Unity or can be made manually. For better lightmap results we opted for doing it manually where:
We can have a better resolution for Lightmap Atlases, avoiding unused space chunks; and
We can hide seams, avoiding cuts in the mesh of objects with low resolution maps.
Also, it is important to use better resolution for objects that will appear near the camera.


Figure 2 Lightmap example.
Sometimes we want to use different lightmaps to give different moods to an environment, or even to be able to change them dynamically. In the Living room environment, for example, the player can use a switch to turn lights on or off (Figure 3). Putting this system to work was a bit challenging.


