
This tutorial will give a step-by-step guide for creating Trello cards from inside a running Unreal Engine 4 project. While you can use this for just about anything you can think of, I personally use this as a way for my players to post bugs from inside the game. If you're not familiar with Trello, I highly suggest you check it out. It's a great tool for project management and organization. It should go without saying, but you're going to need an account on Trello in order to make any progress here.
I also want to mention at this point that this will be a C++ tutorial. Without some form of additional plug-in or other engine modification, you can't make the needed HTTP Request calls. Also, setting this up will assuming you know how to add input mappings and have worked with Widgets a bit.
Note: This was created UE4 4.17.
This article was originally published at Ding! Games.
We're going to start simple, but I'll talk about a few ideas for adding in some variance toward the bottom.
Part I: Trello
We're going to start by going through some steps to authorize access to your Trello account and get the information we need in order to post new cards onto the board of your choice. In the end, we're looking to make an HTTP request to Trello that looks something like this (the italicized parts surrounded by {} are what you'll end up replacing with your own values).
https://api.trello.com/1/cards?key={Your+key}&token={yourtoken}&name={New+card+name}&desc={New+card+description}&idLavels={Label}&idList={list}
Step 1: Key
The first thing to do is generate a key with your Trello account. This will let you start to get the rest of the required items. While logged into Trello, go to the following link:
Step 2: Token
The next step is to authorize write access. Copy the below address, but replace {Your+Key} with the key you got from Step 1 (make sure you take out the {} as well).
https://trello.com/1/authorize?key={Your+Key}&scope=read%2Cwrite&name=My+Application&expiration=never&response_type=token
Step 3: Board Id
Now you need to get the id of the actual board you want your cards to get posted to. Use the following link (no modifications needed):
https://trello.com/1/members/me/boards?fields=name
Exactly how this looks will depend on which Web Browser you're using. For example, Chrome will just spit out all of the text without organizing it at all, while Firefox will sort and color the data for you. Either one is fine, just look for the long string of alpha-numeric characters right after the name of the board you're specifically looking for.
This id isn't actually needed in the HTTP request line, but you need it to get the next two ids...
Step 4: List
Next up, the list within the board you want the cards to post to. As before copy the below, but replace the board id with the id you got from Step 3.
https://api.trello.com/1/boards/{board+id}/lists
Again, how it breaks it out will be determined by what Web Browser you're using. This is where using something like Firefox will make it a lot easier to pick out the exact one you're looking for. This time, the id (not the pos) you need is before the name of the list you want to post to. Also, make sure you don't inadvertently copy the board id again.
Just one more...
Step 5: Label
Last, but not least, is the label you want put on the card itself when it gets posted. This should be getting familiar, replace the board id in the address with your own.
https://api.trello.com/1/boards/{board+id}/labels
As with step 4, this can be a bit messy if your browser doesn't break it out for you, but you should be getting the hang of it by name. Grab the id (first entry per set) for the color you want your bards to post as.
Okay, hopefully you copied all those ids down somewhere, because you're going to need them for the next part, actually writing out the code.
Part II: C++ Code
Now that we've got all of the various ids that we need, it's time to dive into doing some code.
Step 1: HTTP Module
First up, we need to make a small edit to the build file, and include the HTTP module.
public class Zeus : ModuleRules
{
	public Zeus(ReadOnlyTargetRules Target) : base(Target)
	{
		PublicDependencyModuleNames.AddRange(new string[] { "Core", "CoreUObject", "Engine", "InputCore", "HTTP" });

		PrivateDependencyModuleNames.AddRange(new string[] {  });
	}
}
Step 2: Header Definition
Now, on to the actual implementation. I added my logic in the Game Mode, but you can actually put it just about anywhere you want. I'm also going to show a very simplistic setup, although I'll give some ideas on how to expand upon it at the bottom.
#pragma once

#include "ZeusFunctionLibrary.h"
#include "StandardPlayerController.h"
#include "Http.h"

#include "GameFramework/GameMode.h"
#include "ZeusGameMode.generated.h"

UCLASS()
class ZEUS_API AZeusGameMode : public AGameMode
{
	GENERATED_BODY()

public:
	AZeusGameMode();

	/** Used to report a bug */
	UFUNCTION(BlueprintCallable, Category = "Trello")
	void ReportBug(FString Name, FString Description);

	UFUNCTION(BlueprintImplementableEvent, Category = "Trello")
	void ReportBugComplete(bool bWasSuccessful);

private:
	void OnReportBugComplete(FHttpRequestPtr Request, FHttpResponsePtr Response, bool bWasSuccessful);

};
There are three functions defined in the above code:ReportBug: My goal is to have bugs reported from the game's GUI, so I wanted to be able to have the actual reporting of the bug called from blueprints. This function is passing the Name of the bug, and the full description (both entered by the player). You can modify this as you see fit.
ReportBugComplete: This is implemented more for testing purposed. It's used to push the result of the bug submission back up to Blueprints to be handled. You can modify this as desired, or just remove it entirely.
OnReportBugComplete: This is the function that gets automatically called after your HTTP request is processed. As such, it has to stay as is.
Now to the best part, submitting the card!
Step 3: Implementation
Here's the code:
#include "Zeus.h"
#include "ZeusGameMode.h"

const FString TrelloCards = "https://api.trello.com/1/cards?";

const FString Key = "1234567890abcdefghijklmnopqrstuv";
const FString Token = "123456789abcdefghijklmnopqrstuvwxyz123456789abcdefghijklmnopqrst";
const FString Label = "123456789abcdefghijklmno";
const FString List = "123456789abcdefghijklmno";

AZeusGameMode::AZeusGameMode()
{
	// Nothing extra needed in the constructor for this
}

void AZeusGameMode::ReportBug(FString Name, FString Description)
{
	TSharedRef Request = FHttpModule::Get().CreateRequest();
	Request->SetVerb("POST");

	//Replace all the spaces with +
	Name = Name.Replace(TEXT(" "), TEXT("+"));
	Description = Description.Replace(TEXT(" "), TEXT("+"));

	//Construct the HTTP url
	FString URL = TrelloCards +
		"key=" + Key +
		"&token=" + Token +
		"&name=" + Name +
		"&desc=" + Description + "+(V:+" + UZeusFunctionLibrary::GetProjectVersion() + ")" +
		"&idList=" + List +
		"&idLabels=" + Label;

	// Set the built URL
	Request->SetURL(URL);
	// Bind OnReportBugComplete() to be called once the request is complete
	Request->OnProcessRequestComplete().BindUObject(this, &AZeusGameMode::OnReportBugComplete);
	// Process the request
	Request->ProcessRequest();
}

void AZeusGameMode::OnReportBugComplete(FHttpRequestPtr Request, FHttpResponsePtr Response, bool bWasSuccessful)
{
	// Calls up to a Blueprint implemented event
	ReportBugComplete(bWasSuccessful);
}
All of the logic takes place in the ReportBug function, essentially going through the following steps:
Create the request and set it to POST (This is an HTTP protocol thing)
Change all of the spaces to + (Another HTTP protocol thing)
Build out the full string to be reported, using the model I posted way up top. Note that I have a function in there that adds on the current project version to the description. This is very handy for tracking bugs, as you really want to know what version someone is playing, without having to worry about them typing it in themselves somwhere.
Set the built URL against the Request, bind the OnReportBugComplete() function and then process the request.
That's it for the code level. This alone gives you a good bit of freedom for what to do, but I'll show you a simple implementation at the Blueprint level next.
Phase 3: Blueprints
Step 1: Widget
First, lets build out our Widget that the player will actually use to input their bug:
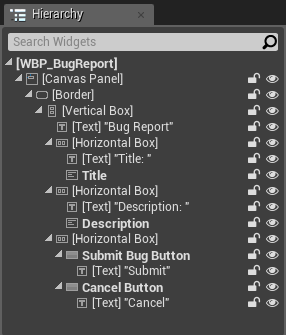

I was looking for functional when I threw this together, not pretty. It's an extremely simplistic Widget, with some texts boxes for the user to input a title and description of the bug, and then either Submit, or Cancel.
The buttons have the following attached to their respective OnClick() events:
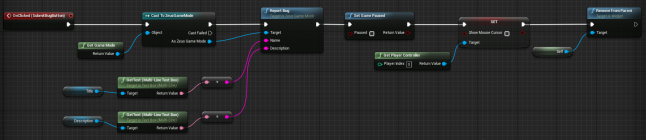
Submit:
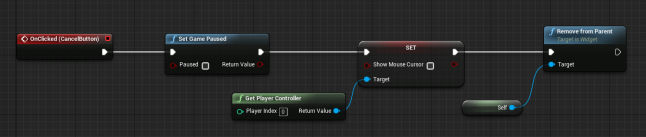
Cancel:
Step 2: Input Mapping
Under project Settings->Input, we want to add an action mapping to start of this whole series of events:


