Last time I wrote about crunch in the games industry, and why it’s a really, really bad practice. It was both fun and a bit distressing to see how much attention that text has gotten in just one week. Studies have time and time again shown that working extensive overtime is bad for you, the product and the rest of the team. In almost all other industries overtime is seen as a management failure. The average career length of a Norweigan game developer is around four years, before they quit or are burned out. This time I’ll write about how we at Midnight Hub go about to make our upcoming puzzle game Lake Ridden. We’re a five-man strong team, based in Sweden. The following methodolgy is a suggestion I hope you can find useful when planning your own game!
 In this post, I will talk about how we make our games with the ABC-recipe as a guideline! This post was originally posted on our developer blog here.
Before co-founding Midnight Hub I’ve worked at Paradox and Tarsier, among others. Comments and feedback on this piece are always welcome here, or you can find me on Twitter. This is the second part of a blog post series focusing making games in a smarter way. Stay tuned for part three!
Why Talk About Project Management To Control Stress?
There are a lot of factors that can cause stress or burnout. If we focus on work-related burnout or stress symptoms they usually arise from:
1) Feeling like you have little or no control over your work
2) Lack of recognition or reward for good work
3) Unclear or overly demanding job expectations
4) Doing work that’s monotonous or unchallenging
5) Working in a chaotic or high-pressure environment
Having bad project management or unrealistic planning for a project can trigger almost all of the above to come true. Of course, there are things you can’t curb with better planning, like a key member becoming sick or new VAT-regulations for games, but I do believe a lot of things can be planned for. A solid project plan starts with a clear vision for the game. You need to have a strong vision of what your game should be. Sometimes it’s the job of one person, and sometimes it’s a team taking care of this. Having a clear vision for the game takes time to establish, and it will change during the course of your project. Games hate to be made, and it’s a lot of hard work to bring them into this world.
When You Know WHAT to Build You Can Decide HOW
Get everyone aboard for your vision! Talk to people, experiment with a prototype, have your team play similar games, collect art showcasing the style etc. The pre-production for the game is extremely important. Only when you know WHAT you want to build, you can talk about HOW to build it. If you have a healthy approach for the HOW-part, you can hopefully avoid 1, 3, 4 and 5 on the list of stressors!
.jpg/?width=646&auto=webp&quality=80&disable=upscale) An example of our forest in Lake Ridden. To the left, you can see step B, while the right (still work in progress) is even past step C. The images are taken about a year apart.
An example of our forest in Lake Ridden. To the left, you can see step B, while the right (still work in progress) is even past step C. The images are taken about a year apart.
When you establish the vision for your game and work on the pre-production you need to research and list all possible limitations surrounding your upcoming game. By this, I mean a myriad of things such as: typical genre-expectations for a game like the one you want to build, how much money you will have in the bank, accessible memory-usage for your game, average playtime for this kind of a game, release windows etc. All these important limitations should shape the game you are trying to build. I know it’s super boring to focus on limitations when you just want to make a damn good game, but these limitations will work as your framework for setting up the plan and project management for your upcoming game. Establishing any limitations as early as possible will help you define clear goals for the project. They will also serve as a reality check. Is what you’re planning to build reasonable at all, regarding the team size, money and time you got? It’ will help you plot actual deadlines into the calendar.
The A-B-C Treatment For Making Games
Our game Lake Ridden is a fairly linear single-player experience. A mystery game filled with puzzles and story, estimated to take between 3-6 hours to finish. With this in mind, we chopped the game into nine or ten “chapters” for us to work on. One chapter could be the Forest, another one the big Estate which the player explores.
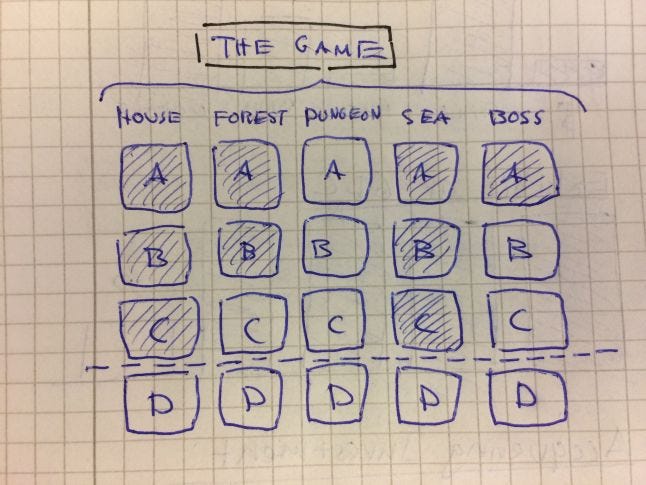 An example of a made-up game, chopped up game using the ABC-treatment. The team works on different parts at different times. Each part is clearly defined. This does not take into consideration things such as marketing, big programming tasks, HR, voice acting etc.
Each chapter gets our ABC-treatment. We have found that it’s not necessary to first do ALL the A-iterations of the game before starting with the Bs, but it sure does help! And you don’t have to do them in the same order as the player progresses.
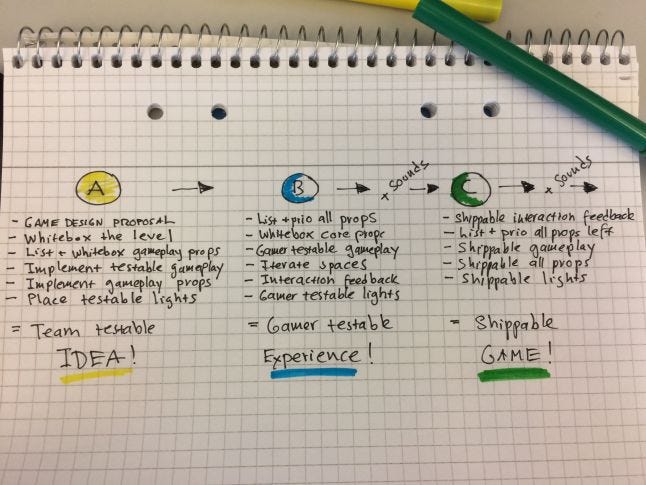
This method is something we developed together, but I must admit our lead programmer Johan was the one who laid the foundations about a year ago. You’ll notice that there might be some things that fall outside these steps, like sound, big programming tasks, voice lines, QA, team management etc. Sometimes things happen in a different order, and sometimes a step takes more time. We view these steps as guidelines. It’s also important to know that we divide all in-game props into three categories:
Essential gameplay props needed to test the basic gameplay (walls, floor, boxes, a light switch etc)
Core props needed to convey the idea of the area (chairs, tables, trees etc)
Detail props that add atmosphere and quality (strains of grass, fireflies, dirty plates in a kitchen, different books on a bookshelf etc)
Step A – the goal is a team testable idea
Let’s have a look at the different steps! Step A should give you a very, very rough testable version of an area in the game. The goal here is for other team members to be able to test the level and give feedback. Step 3, 4 and 5 are often done more or less simultaneously:
The game design team drafts a game design proposal for the level/area. What is the main gameplay for this area? No one codes anything in this step, they just talk, draw and debate. What are the puzzles? What is the purpose of this gameplay? When they’re done they present it to the whole team to get feedback.
The art and design team identify and list all crucial gameplay props needed to test the idea of this part of the game.
Level designers whiteboxes the main environment for this area. Establish the boundaries of this area.
Whitebox the gameplay and environment props. It’s OK if it’s just white boxes or placeholder ugly stuff. Get them in there!
Programmers implement the team testable gameplay. Make the basic gameplay work.
Basic gameplay lights are placed out, to enable another team member to test everything. Or you can just have one big light so people can see the level while testing.
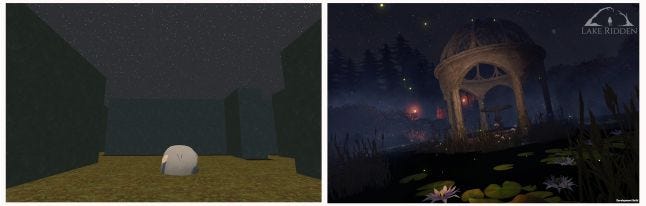 Basically the very same level, about a year apart. The left image shows us testing out the gameplay using ugly placeholder art. The right image is still work in progress, but we’re now done with step C!
When we have this (it usually takes us one week to get this up and running) we can try basic gameplay and see how we feel about it. Does it even work? Is it fun? Does it make sense? Things are extremely rough and often broken at this stage, but that’s OK!
Step B – the goal is a gamer testable experience
The theoretical goal here is for someone from your target audience to be able to try the game, with some help from the devs, at the office. We call this step “What Makes A Kitchen A Kitchen?”. What are the bare minimums to make a convincing kitchen level?
Art and design team list and prioritizes gameplay props, core props, and detail props.
Whitebox + implement core props. Core props are the stuff needed to give the level some personality.
Gamer testable gameplay + gamer testable environments. This means iterating the gameplay and spaces.
Gamer testable interaction feedback implemented. Just basic interaction feedback, like a sound, a basic particle effect etc. It’s hard to test a game on a gamer if they don’t get any interaction feedback at all from the game.
Gamer testable lights. Placing out basic lights needed to test the level on a gamer.
When you’re done with step B you should be able to test your game together with someone from your intended audience. We usually spend 1-2 weeks making a B-section. The level will still be a bit confusing for the gamer, and a developer probably needs to help the gamer, but it should be possible to get a response from your audience. Do they understand what you are trying to do, and do they like it? And do remember, as a developer you’ll see a thousand things want to fix at this stage. Resist the urge to start polishing in this phase!
Step C – the goal is to make it shippable
The goal here is to be able to ship if time runs out. You don’t want to have to ship after doing this stage, but if something bad happens to your team or planning you could theoretically


